
I’ve always wondered how people are able to put pictures in shapes and words. We would usually see this on Tumblr or Pinterest. So I decided to try it out and it turned out to be quite simple. You just need Photoshop for this.
First, click the custom shape tool.
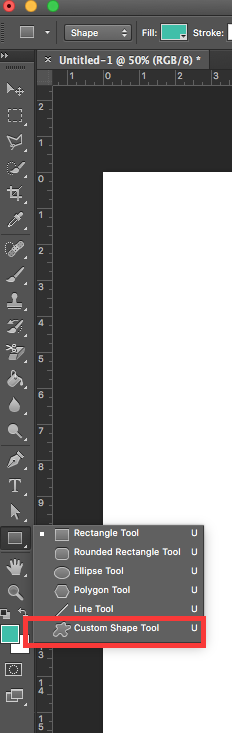
You can choose from any shapes. I will be using the hexagonal shape. Drag out the cursor until you find the size that you like.


Next we would be duplicating the layer. Go to the layer and right click on the layer you want to duplicate. In this case it would be the shape.

Once duplicated another layer will appear. Do not be alarm if you don’t see it because it is on top of the original layer. So make sure that the copied layer (in this case the layer name is ‘Shape 1 Copy’) is selected as shown below.

Then you move the shape to anywhere you wish to place it. I am going to place it beside the original shape.

Then repeat the steps. I duplicated the layer about 6 times.

The layers may look a bit messy and confusing so I’m going to rearrange the layers. Just select the layer that you wish to arrange and drag it.


Have the folder image open and drag the image into photoshop and onto the shape. Then press enter to place the image.

You can move it around and resize it using the cursor icon at the tools bar.
The image layer will appear on the top as shown on the layer bar. I wanted this image for a specific shape. In this case it will be for ‘Shape 1’. Click on the image layer and drag it below until it is at the top of ‘Shape 1’ layer.


It would look like this when you drag the image layer above the ‘Shape 1’ layer.

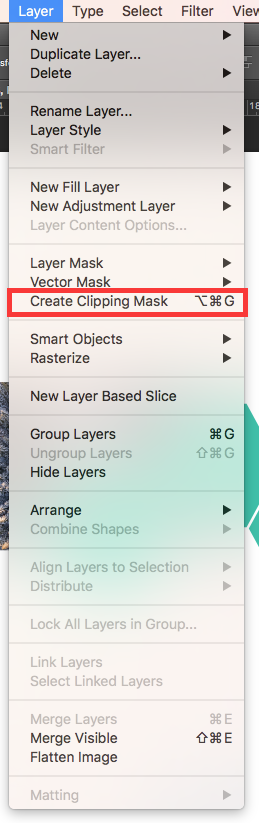
Have the image layer selected and then go to layer and click on create clipping mask.

The image will be within the shape. Just move the image if you are not satisfied with how it looks (keep in mind that the image layer must be selected when you want to move the image).

Repeat the steps and you are done! Here is the final look:

And that’s it! That’s how you ‘insert’ an image in shapes and texts. It would get easier once you get the hang of it so don’t worry! Here are some other shapes and text that I tried out as well that you guys can get inspiration from:


So there you have it! Have fun with this tutorial and explore your creativity. You may end up surprising yourself with what you can do.
‘Till next time!
You must be logged in to post a comment.